9. WiFi 配网
9.1 Web 网页配网
首先WiFi设备处于AP模式,默认IP地址为192.168.4.1。通过网页访问IP连上这个AP,在输入框中输入路由器网络WiFi的SSID和密码,WiFi设备收到后,切换到STA模式,利用收到的信息联网。优点是成功率100%,但是需要一个按钮让设备进入配置模式。
WEB 网页配网有如下优点:
直接输入,配网简单,过程明了,成功率高。
可以配至的路由或热点,不受限制不必连互联网。
不需要在系统上添加其他接口,适合封闭或不方便引出额外接口的场合。
可以通过任意支持WIFI和浏览器的设备来配网,非常灵活实用
例程:Web 网页配网
#include <WiFi.h>
#include <WebServer.h>
#include <ESPmDNS.h>
#include <esp_wifi.h>

const char* AP_SSID  = "Edge101WE_"; //热点名称
String wifi_ssid = "";
String wifi_pass = "";
String scanNetworksID = "";//用于储存扫描到的WiFi

#define ROOT_HTML  "<!DOCTYPE html><html><head><title>WIFI Config by DFRobot</title><meta name=\"viewport\" content=\"width=device-width, initial-scale=1\"></head><style type=\"text/css\">.input{display: block; margin-top: 10px;}.input span{width: 100px; float: left; float: left; height: 36px; line-height: 36px;}.input input{height: 30px;width: 200px;}.btn{width: 120px; height: 35px; background-color: #000000; border:0px; color:#ffffff; margin-top:15px; margin-left:100px;}</style><body><form method=\"GET\" action=\"connect\"><label class=\"input\"><span>WiFi SSID</span><input type=\"text\" name=\"ssid\"></label><label class=\"input\"><span>WiFi PASS</span><input type=\"text\"  name=\"pass\"></label><input class=\"btn\" type=\"submit\" name=\"submit\" value=\"Submie\"> <p><span> Nearby wifi:</P></form>"
WebServer server(80);

#define RESET_PIN   38  //GPIO 38 User Key用于删除WiFi信息

void setup() {

  Serial.begin(115200);
  pinMode(RESET_PIN, INPUT_PULLUP);

  // 连接WiFi
  if (!AutoConfig())
  {
    wifi_Config();
  }

  //用于删除已存WiFi
  if (digitalRead(RESET_PIN) == LOW) {
    Serial.println("Delete WiFi and restart");
    delay(1000);
    esp_wifi_restore();
    delay(10);
    ESP.restart();  //复位esp32
  }
}

void loop() {
  server.handleClient();
  while (WiFi.status() == WL_CONNECTED) {
    //WIFI已连接

  }
}

//用于配置WiFi
void wifi_Config()
{
  Serial.println("scan start");
  // 扫描附近WiFi
  int n = WiFi.scanNetworks();
  Serial.println("scan done");
  if (n == 0) {
    Serial.println("no networks found");
    scanNetworksID = "no networks found";
  } else {
    Serial.print(n);
    Serial.println(" networks found");
    for (int i = 0; i < n; ++i) {
      // Print SSID and RSSI for each network found
      Serial.print(i + 1);
      Serial.print(": ");
      Serial.print(WiFi.SSID(i));
      Serial.print(" (");
      Serial.print(WiFi.RSSI(i));
      Serial.print(")");
      Serial.println((WiFi.encryptionType(i) == WIFI_AUTH_OPEN) ? " " : "*");
      scanNetworksID += "<P>" + WiFi.SSID(i) + "</P>";
      delay(10);
    }
  }
  Serial.println("");

  WiFi.mode(WIFI_AP);//配置为AP模式
  boolean result = WiFi.softAP(AP_SSID, ""); //开启WIFI热点
  if (result)
  {
    IPAddress myIP = WiFi.softAPIP();
    //打印相关信息
    Serial.println("");
    Serial.print("Soft-AP IP address = ");
    Serial.println(myIP);
    Serial.println(String("MAC address = ")  + WiFi.softAPmacAddress().c_str());
    Serial.println("waiting ...");
  } else {  //开启热点失败
    Serial.println("WiFiAP Failed");
    delay(3000);
    ESP.restart();  //复位esp32
  }

  if (MDNS.begin("esp32")) {
    Serial.println("MDNS responder started");
  }

  //首页
  server.on("/", []() {
    server.send(200, "text/html", ROOT_HTML + scanNetworksID + "</body></html>");
  });

  //连接
  server.on("/connect", []() {

    server.send(200, "text/html", "<html><body><font size=\"10\">successd,wifi connecting...<br />Please close this page manually.</font></body></html>");

    WiFi.softAPdisconnect(true);
    //获取输入的WIFI账户和密码
    wifi_ssid = server.arg("ssid");
    wifi_pass = server.arg("pass");
    server.close();
    WiFi.softAPdisconnect();
    Serial.println("WiFi Connect SSID:" + wifi_ssid + "  PASS:" + wifi_pass);

    //设置为STA模式并连接WIFI
    WiFi.mode(WIFI_STA);
    WiFi.begin(wifi_ssid.c_str(), wifi_pass.c_str());
    uint8_t Connect_time = 0; //用于连接计时,如果长时间连接不成功,复位设备
    while (WiFi.status() != WL_CONNECTED) {  //等待WIFI连接成功
      delay(500);
      Serial.print(".");
      Connect_time ++;
      if (Connect_time > 80) {  //长时间连接不上,复位设备
        Serial.println("Connection timeout, check input is correct or try again later!");
        delay(3000);
        ESP.restart();
      }
    }
    Serial.println("");
    Serial.println("WIFI Config Success");
    Serial.printf("SSID:%s", WiFi.SSID().c_str());
    Serial.print("  LocalIP:");
    Serial.print(WiFi.localIP());
    Serial.println("");

  });
  server.begin();
}

//用于上电自动连接WiFi
bool AutoConfig()
{
  WiFi.begin();
  for (int i = 0; i < 20; i++)
  {
    int wstatus = WiFi.status();
    if (wstatus == WL_CONNECTED)
    {
      Serial.println("WIFI SmartConfig Success");
      Serial.printf("SSID:%s", WiFi.SSID().c_str());
      Serial.printf(", PSW:%s\r\n", WiFi.psk().c_str());
      Serial.print("LocalIP:");
      Serial.print(WiFi.localIP());
      Serial.print(" ,GateIP:");
      Serial.println(WiFi.gatewayIP());
      return true;
    }
    else
    {
      Serial.print("WIFI AutoConfig Waiting......");
      Serial.println(wstatus);
      delay(1000);
    }
  }
  Serial.println("WIFI AutoConfig Faild!" );
  return false;
}
WiFiManager配网库,另外一种强大的网页配网
WiFiManager 是 WiFi连接管理器,主要是提供Web页面配置功能,包括Web配网、自定义参数配置。
WiFiManager 工作原理
当 Edge101WE 主板上电启动时,它首先进入STA模式,然后尝试去连接之前已经保存过的AP热点。
如果连接失败(可能是因为没有保存上一次的热点信息),那么该库就会让主板进入AP模式并且提供AP热点,启动并监听DNS服务以及Web服务(默认ip地址是192.168.4.1)。
使用任何可以连接WiFi并且可以使用浏览器的设备(包括电脑、手机、平板)去连接主板生成的AP热点。
由于 DNS服务 Captive Portal功能的存在,会导致任何的网络请求都重定向到 认证配置页面(也就是我们的Web配置页面)
选择任意一个扫描到的AP热点,输入热点密码,点击保存。
主板会尝试去连接新AP热点,如果连接成功,就返回到我们的正常业务,连接失败,就会再次重复上面的操作。
WiFiManager API参考
setConfigPortalTimeout() - 配置认证超时
默认情况下,如果启动配置门户,autoConnect方法调用将阻止程序执行,同时等待用户在门户中执行网络配置(或退出)。如果要设置超时,可以在WiFiManager对象上调用此方法,当超过设置的时间没有配置,程序将自动退出配置模式。
语法
#include <WiFiManager.h>
WiFiManager wm; // global wm instance
wm.setConfigPortalTimeout(30); // auto close configportal after n seconds
参数
| 传入值 | 说明 | 值范围 |
|---|---|---|
| unsigned long seconds | 单位为秒 |
返回
无
注意
配置界面超时,指的是用户进入配置界面后多少秒之内如果没有处理完毕就退出整个配置过程。
默认情况下,configPortalTimeout 等于0,也就是不限制时间。
setConnectTimeout() - 设置STA连接超时时间
设置STA连接超时,超过时间就返回连接状态。
语法
#include <WiFiManager.h>
WiFiManager wm; // global wm instance
wm.setConnectTimeout(20); // how long to try to connect for before continuing
参数
| 传入值 | 说明 | 值范围 |
|---|---|---|
| unsigned long seconds | 单位为秒 |
返回
无
setDebugOutput() - 设置是否打开debug模式
建议调试阶段把该功能打开,可以清晰知道整个运行流程。等待调试完毕,关闭调试功能。
语法
#include <WiFiManager.h>
WiFiManager wm; // global wm instance
Serial.setDebugOutput(true);
参数
| 传入值 | 说明 | 值范围 |
|---|---|---|
| boolean debug | true:开启 false:关闭 |
返回
无
setAPStaticIPConfig() - 设置固定AP
设置参数包括IP、网关、子网掩码。
此方法用于设置主板在AP模式下固定的AP信息,不设置默认为192.168.4.1 。
语法
#include <WiFiManager.h>
WiFiManager wm; // global wm instance
wm.setAPStaticIPConfig(IPAddress(10,0,1,99), IPAddress(10,0,1,1), IPAddress(255,255,255,0)); // set static ip,gw,sn
参数
| 传入值 | 说明 | 值范围 |
|---|---|---|
| IPAddress ip | IP地址 | |
| IPAddress gw | 网关地址 | |
| IPAddress sn | 子网掩码 |
返回
无
setSTAStaticIPConfig() - 设置固定STA
设置参数包括IP、网关、子网掩码。
此方法用于设置ESP在STA模式下固定的STA信息,不设置默认由DHCP分配。
语法
#include <WiFiManager.h>
WiFiManager wm; // global wm instance
wm.setSTAStaticIPConfig(IPAddress(10,0,1,99), IPAddress(10,0,1,1), IPAddress(255,255,255,0)); // set static ip,gw,sn
参数
| 传入值 | 说明 | 值范围 |
|---|---|---|
| IPAddress ip | IP地址 | |
| IPAddress gw | 网关地址 | |
| IPAddress sn | 子网掩码 |
返回
无
setMinimumSignalQuality() - 设置最小的信号质量
设置能够接受的最低信号强度。此方法用来过滤信号强度低于quality的AP热点,用于scan扫描时过滤。
语法
#include <WiFiManager.h>
WiFiManager wm; // global wm instance
wm.setMinimumSignalQuality(20);  // set min RSSI (percentage) to show in scans, null = 8%
参数
| 传入值 | 说明 | 值范围 |
|---|---|---|
| int quality | 信号强度,默认为8 |
返回
无
setBreakAfterConfig() - 设置Web配置失败后是否退出配置
语法
#include <WiFiManager.h>
WiFiManager wm; // global wm instance
wm.setBreakAfterConfig(true);   // always exit configportal even if wifi save fails
参数
| 传入值 | 说明 | 值范围 |
|---|---|---|
| boolean shouldBreak | true:如果WiFi保存失败退出配置 false:不退出配置 |
返回
无
setAPCallback() - 设置开启AP模式配置时的通知回调
语法
#include <WiFiManager.h>
WiFiManager wm; // global wm instance
参数
| 传入值 | 说明 | 值范围 |
|---|---|---|
| void (*func)(WiFiManager* myWiFiManager) | 回调函数 |
返回
无
setSaveConfigCallback() - 设置保存Web配置后的回调
此方法主要是告知我们已经点击保存配置信息了。
语法
#include <WiFiManager.h>
WiFiManager wm; // global wm instance
参数
| 传入值 | 说明 | 值范围 |
|---|---|---|
| void (*func)(void) | 回调函数 |
返回
无
addParameter() - 配置页面添加自定义参数
普通情况下我们一般只配置 SSID 和 Password,如果你还需要添加额外的参数(比如MQTT IP和port等等),那么这个方法就比较有用。
语法
#include <WiFiManager.h>
WiFiManager wm; // global wm instance
// test custom html(radio)
  const char* custom_radio_str = "<br/><label for='customfieldid'>Custom Field Label</label><input type='radio' name='customfieldid' value='1' checked> One<br><input type='radio' name='customfieldid' value='2'> Two<br><input type='radio' name='customfieldid' value='3'> Three";
  new (&custom_field) WiFiManagerParameter(custom_radio_str); // custom html input

  wm.addParameter(&custom_field);
参数
| 传入值 | 说明 | 值范围 |
|---|---|---|
| WiFiManagerParameter *p | 自定义参数 |
返回
| 返回值 | 说明 | 值范围 |
|---|---|---|
| bool | true:添加成功 false:添加失败 |
setCustomHeadElement() - 设置自定义页面的头部元素
添加一个自定义的element到页面头部 比如加个头像。
语法
#include <WiFiManager.h>
WiFiManager wm; // global wm instance
参数
| 传入值 | 说明 | 值范围 |
|---|---|---|
| const char* element | element样式的字符串 |
返回
无
setRemoveDuplicateAPs() - 设置是否过滤重复的AP热点
语法
#include <WiFiManager.h>
WiFiManager wm; // global wm instance
wm.setRemoveDuplicateAPs(false); // do not remove duplicate ap names (true)
参数
| 传入值 | 说明 | 值范围 |
|---|---|---|
| boolean removeDuplicates | true:过滤(默认值) false:不过滤 |
返回
无
resetSettings() - 重置配置
保存凭据后再次尝试登录 AP,你可以简单地调用 resetSettings()。此方法不带任何参数,它将删除保存的凭据,这对于测试目的非常有用。
语法
#include <WiFiManager.h>
WiFiManager wm; // global wm instance
wm.resetSettings();
参数
无
返回
无
getConfigPortalSSID() - 获取Web配置的SSID
语法
#include <WiFiManager.h>
WiFiManager wm; // global wm instance
ssid = wm.getConfigPortalSSID();
参数
无
返回
| 返回值 | 说明 | 值范围 |
|---|---|---|
| String | 获取AP配置的SSID |
autoConnect() - 自动连接到上一次保存的AP热点
如果连接失败,进入 AP 配网模式。
自动连接到上一次保存的 AP 热点。如果连接失败,就会进入 web 配网页面(也就是 startConfigPortal 这个方法)。用户可以自定义AP模式下的SSID和Password。当不带参数时会使用芯片 ID 作为 SSID,当不带密码参数时为无密码登录方式。
语法
#include <WiFiManager.h>
WiFiManager wm; // global wm instance
bool res;
// res = wm.autoConnect(); // auto generated AP name from chipid
// res = wm.autoConnect("AutoConnectAP"); // anonymous ap
res = wm.autoConnect("AutoConnectAP","password"); // password protected ap
参数
| 传入值 | 说明 | 值范围 |
|---|---|---|
| char const *apName | AP模式下的名字 | |
| char const *apPassword | AP模式下的密码 |
返回
| 返回值 | 说明 | 值范围 |
|---|---|---|
| boolean | true:连接成功 false:连接失败( 会直接进入配网管理) |
connectWifi() - 连接AP热点
语法
#include <WiFiManager.h>
WiFiManager wm; // global wm instance
参数
| 传入值 | 说明 | 值范围 |
|---|---|---|
| String ssid | AP的名字 | |
| String pass | AP的密码 |
返回
| 返回值 | 说明 | 值范围 |
|---|---|---|
| int | 返回连接状态 WL_CONNECTED:连接成功 |
注意:
DEBUG_WM debug功能的实现由 setDebugOutput 控制
_sta_static_ip 的值 由 setSTAStaticIPConfig 设置
waitForConnectResult 里面 的 _connectTimeout 由 setConnectTimeout 设置
startConfigPortal() - 启动web配置
配置认证,切换到AP模式 然后配置webserver和dnsserver,响应web请求。
语法
#include <WiFiManager.h>
WiFiManager wm; // global wm instance
if (!wm.startConfigPortal("OnDemandAP","password")) {
        Serial.println("failed to connect or hit timeout");
        delay(3000);
        // ESP.restart();
}
else {
        //if you get here you have connected to the WiFi
        Serial.println("connected...yeey :)");
}
参数
| 传入值 | 说明 | 值范围 |
|---|---|---|
| char const *apName | AP的名字 | |
| char const *apPassword | AP的密码 |
返回
| 返回值 | 说明 | 值范围 |
|---|---|---|
| boolean | true:配置成功 false:配置失败 |
handleRoot() - 根目录页面
响应root请求,此方法是整个配置页面的入口页面,包含多个功能入口。
包括:
Configure WiFi、Configure WiFi(No Scan)— handleWifi
Info — handleInfo
Reset — handleReset
参数
无
返回
无
handleWifi() - 配置WiFi信息
点击 Configure WiFi、Configure WiFi(No Scan) 就会响应此方法。
参数
| 传入值 | 说明 | 值范围 |
|---|---|---|
| boolean scan | 是否开启扫描 | true、false |
返回
无
handleWifiSave() - 保存WiFi信息
在wifi配置页面点击 save 操作就会响应此方法。
参数
无
返回
无
handleInfo() - 获取主板的信息
在WiFi配置页面点击 Info 操作就会响应此方法。
参数
无
返回
无
handleReset() - 重置WiFi模块信息
在WiFi配置页面点击 Reset 操作就会响应此方法。
参数
无
返回
无
例程:Basic
(参考Arduino IDE例程 Examples -> Examples for Edge101WE ->WiFiManager\examples\Basic)
#include <WiFiManager.h> // https://github.com/tzapu/WiFiManager

void setup() {
    // 注意:这里使用WIFI_AP_STA,当执行resetSettings()后才能成功启动AP
    WiFi.mode(WIFI_AP_STA); // explicitly set mode, esp defaults to STA+AP

    // put your setup code here, to run once:
    Serial.begin(115200);

    // WiFi.mode(WiFi_STA); // it is a good practice to make sure your code sets wifi mode how you want it.

    //WiFiManager, Local intialization. Once its business is done, there is no need to keep it around
    WiFiManager wm;

    //reset settings - wipe credentials for testing
    //wm.resetSettings();

    // Automatically connect using saved credentials,
    // if connection fails, it starts an access point with the specified name ( "AutoConnectAP"),
    // if empty will auto generate SSID, if password is blank it will be anonymous AP (wm.autoConnect())
    // then goes into a blocking loop awaiting configuration and will return success result

    bool res;
    // res = wm.autoConnect(); // auto generated AP name from chipid
    // res = wm.autoConnect("AutoConnectAP"); // anonymous ap
    res = wm.autoConnect("AutoConnectAP","password"); // password protected ap

    if(!res) {
        Serial.println("Failed to connect");
        // ESP.restart();
    }
    else {
        //if you get here you have connected to the WiFi
        Serial.println("connected...yeey :)");
    }

}

void loop() {
    // put your main code here, to run repeatedly:

}
将以上代码下载到主板,如果没有连接过本地WiFi网络串口将打印如下信息:
*WM: [1] AutoConnect
*WM: [1] No Credentials are Saved, skipping connect
*WM: [2] Starting Config Portal
*WM: [2] AccessPoint set password is VALID
*WM: [1] password
*WM: [3] WIFI station disconnect
*WM: [3] WiFi station enable
*WM: [2] Disabling STA
*WM: [2] Enabling AP
*WM: [1] StartAP with SSID:  AutoConnectAP
*WM: [1] SoftAP Configuration
*WM: [1] --------------------
*WM: [1] ssid:             AutoConnectAP
*WM: [1] password:         password
*WM: [1] ssid_len:         13
*WM: [1] channel:          1
*WM: [1] authmode:         4
*WM: [1] ssid_hidden:
*WM: [1] max_connection:   4
*WM: [1] country:          CN
*WM: [1] beacon_interval:  100(ms)
*WM: [1] --------------------
*WM: [1] AP IP address: 192.168.4.1
*WM: [3] setupConfigPortal
*WM: [1] Starting Web Portal
*WM: [3] dns server started with ip:  192.168.4.1
*WM: [2] HTTP server started
*WM: [2] WiFi Scan completed in 2111 ms
*WM: [2] Config Portal Running, blocking, waiting for clients...
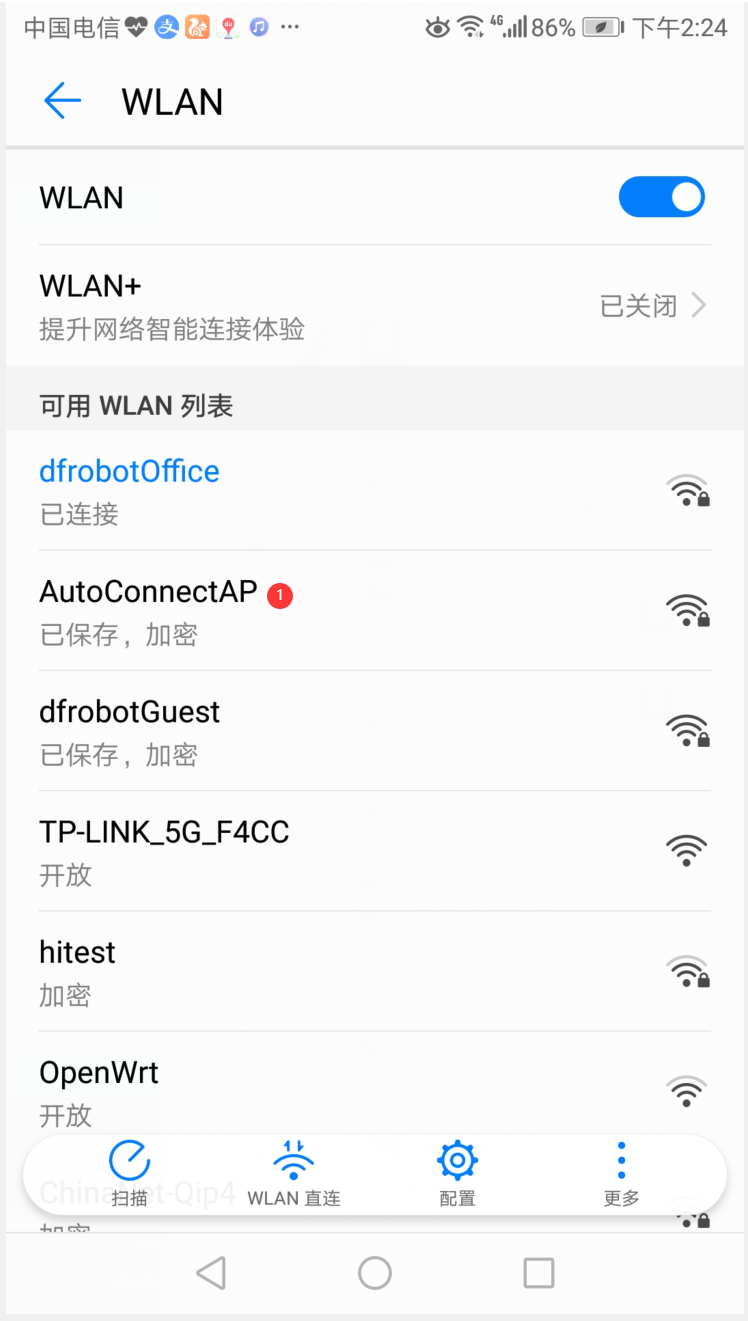
主板将建立一个AP , SSID 为 AutoConnectAP,密码为 password。
通过电脑或者手机连接这个AP。
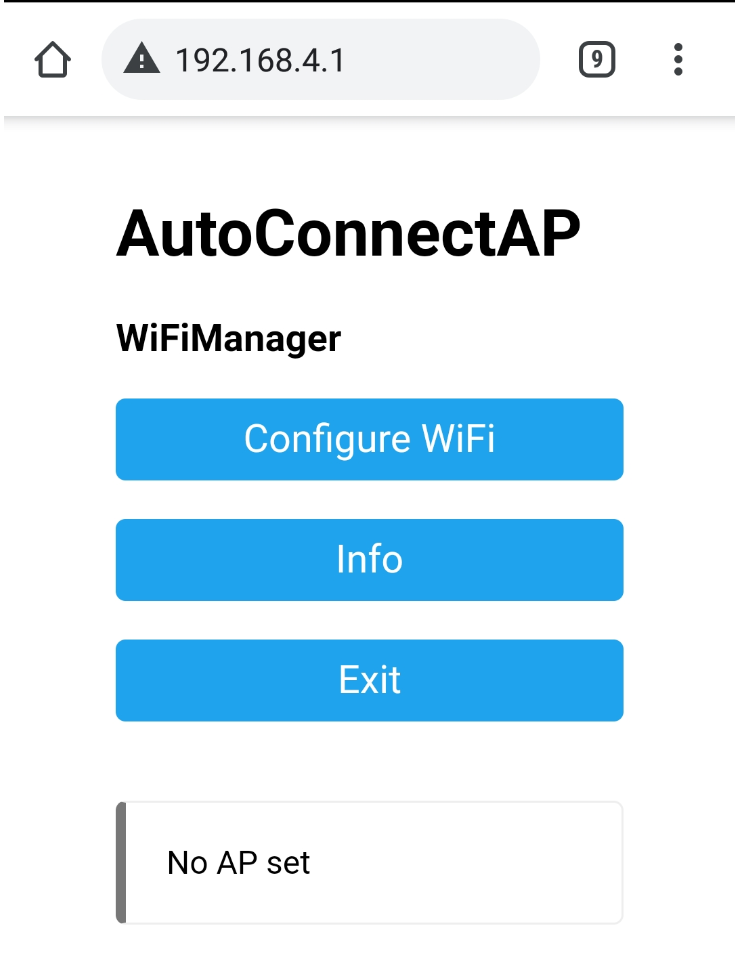
连接AP后通过浏览器访问 192.168.4.1
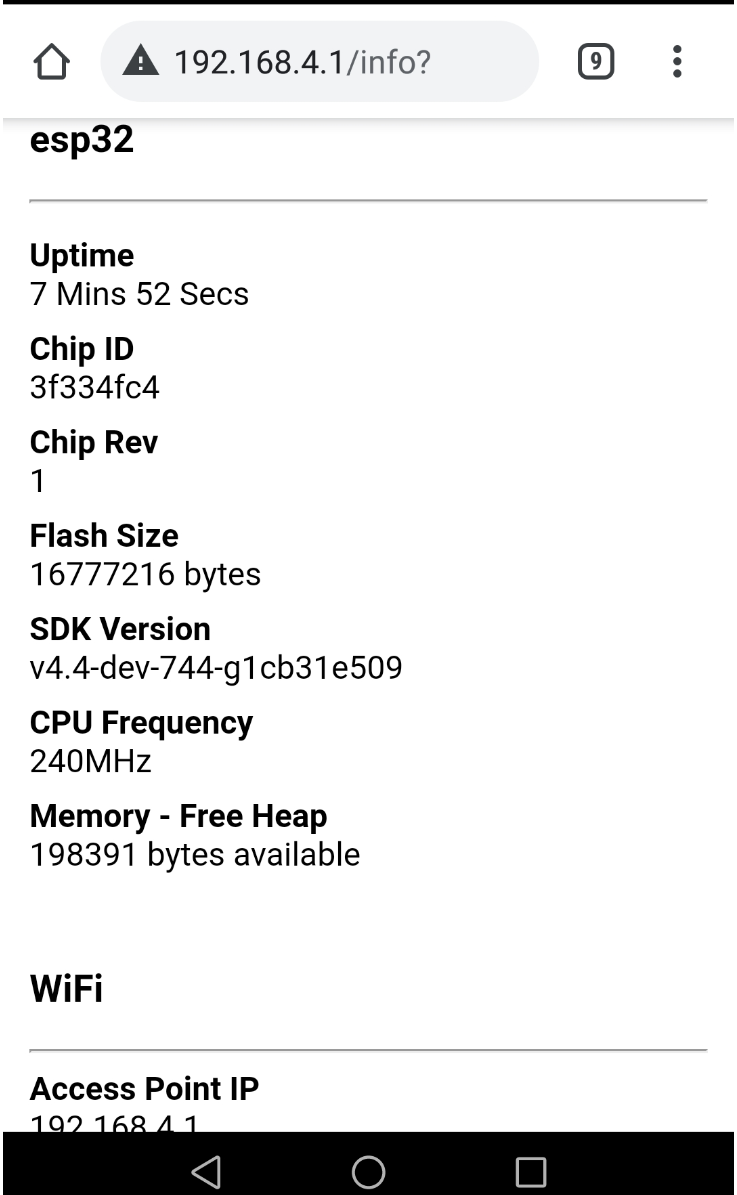
点击Info可显示主板的一些信息。
点击 Configure WiFi 选择需要连接的WiFi网络SSID,并输入网络密码。
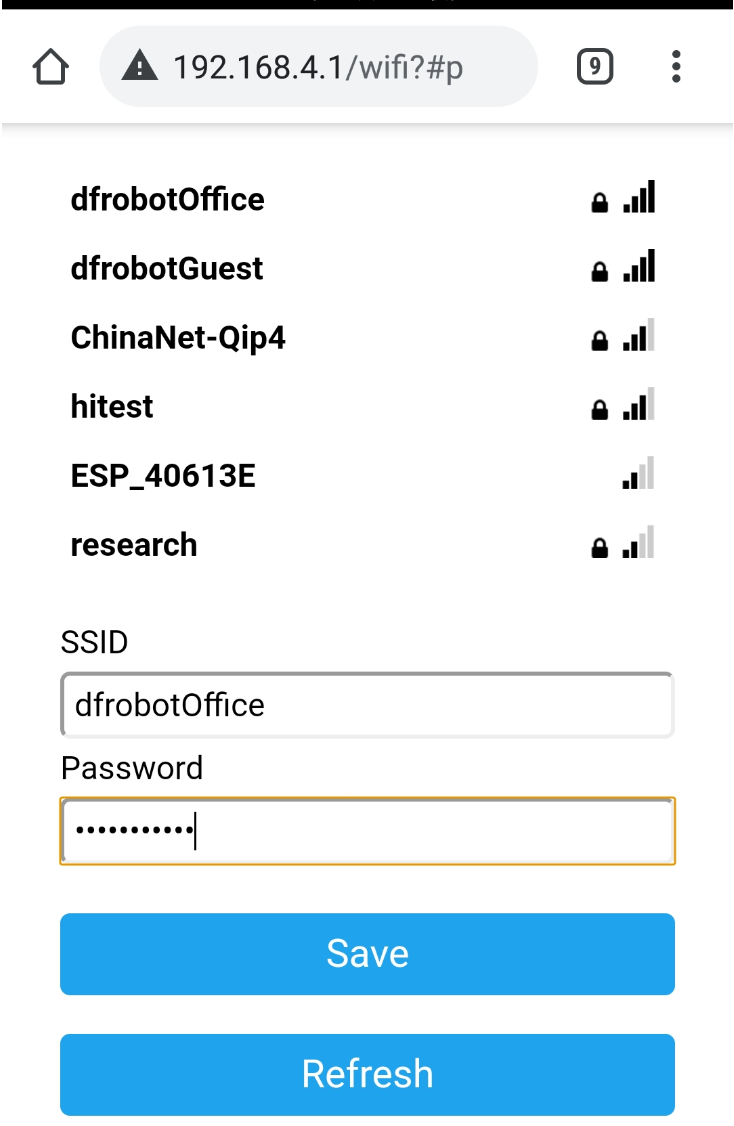
连接后,串口显示已经连接。
*WM: [1] CONNECTED:
*WM: [1] Connecting to NEW AP: dfrobotOffice
*WM: [3] Using Password: xxxxxxxxxxx
*WM: [3] WiFi station enable
*WM: [1] connectTimeout not set, ESP waitForConnectResult...
*WM: [2] Connection result: WL_CONNECTED
*WM: [3] lastconxresult: WL_CONNECTED
*WM: [1] Connect to new AP [SUCCESS]
*WM: [1] Got IP Address:
*WM: [1] 192.168.1.44
*WM: [2] disconnect configportal
*WM: [2] restoring usermode STA
*WM: [2] wifi status: WL_CONNECTED
*WM: [2] wifi mode: STA
*WM: [1] config portal exiting
connected...yeey :)
*WM: [3] unloading
主板在第二次重启后会自动连接选择的WiFi网络,而不会生成AP。如果想重新选择WiFi网络,可以加入 resetSettings() 来清除保存的WiFi网络信息。
//reset settings - wipe credentials for testing
wm.resetSettings();
我们可基于Basic例程,添加项目的其他代码。
例程:Advanced
此代码在Basic代码基础上增加了一个按钮功能,当按下 Edge101WE 主板的板载用户按钮,将会调用 resetSettings() 来清除保存的WiFi网络信息。
另外通过 wm.setConfigPortalTimeout(30) 设置为 30秒没有操作将会自动退出配置页面。
(参考Arduino IDE例程 Examples -> Examples for Edge101WE ->WiFiManager\examples\Advanced)
/**
 * WiFiManager advanced demo, contains advanced configurartion options
 * Implements TRIGGEN_PIN button press, press for ondemand configportal, hold for 3 seconds for reset settings.
 */
#include <WiFiManager.h> // https://github.com/tzapu/WiFiManager

#define TRIGGER_PIN 38	// 板载用户按钮GPIO 38

WiFiManager wm; // global wm instance
WiFiManagerParameter custom_field; // global param ( for non blocking w params )

void setup() {
  WiFi.mode(WIFI_AP_STA); // explicitly set mode, esp defaults to STA+AP
  Serial.begin(115200);
  Serial.setDebugOutput(true);  // 打印调试内容
  delay(3000);
  Serial.println("\n Starting");

  pinMode(TRIGGER_PIN, INPUT);

  // wm.resetSettings(); // wipe settings

  // add a custom input field
  int customFieldLength = 40;


  // new (&custom_field) WiFiManagerParameter("customfieldid", "Custom Field Label", "Custom Field Value", customFieldLength,"placeholder=\"Custom Field Placeholder\"");

  // test custom html input type(checkbox)
  // new (&custom_field) WiFiManagerParameter("customfieldid", "Custom Field Label", "Custom Field Value", customFieldLength,"placeholder=\"Custom Field Placeholder\" type=\"checkbox\""); // custom html type

  // test custom html(radio)
  const char* custom_radio_str = "<br/><label for='customfieldid'>Custom Field Label</label><input type='radio' name='customfieldid' value='1' checked> One<br><input type='radio' name='customfieldid' value='2'> Two<br><input type='radio' name='customfieldid' value='3'> Three";
  new (&custom_field) WiFiManagerParameter(custom_radio_str); // custom html input

  wm.addParameter(&custom_field);
  wm.setSaveParamsCallback(saveParamCallback);

  // custom menu via array or vector
  //
  // menu tokens, "wifi","wifinoscan","info","param","close","sep","erase","restart","exit" (sep is seperator) (if param is in menu, params will not show up in wifi page!)
  // const char* menu[] = {"wifi","info","param","sep","restart","exit"};
  // wm.setMenu(menu,6);
  std::vector<const char *> menu = {"wifi","info","param","sep","restart","exit"};
  wm.setMenu(menu);

  // set dark theme
  wm.setClass("invert");


  //set static ip
  // wm.setSTAStaticIPConfig(IPAddress(10,0,1,99), IPAddress(10,0,1,1), IPAddress(255,255,255,0)); // set static ip,gw,sn
  // wm.setShowStaticFields(true); // force show static ip fields
  // wm.setShowDnsFields(true);    // force show dns field always

  // wm.setConnectTimeout(20); // how long to try to connect for before continuing
  wm.setConfigPortalTimeout(30); // auto close configportal after n seconds
  // wm.setCaptivePortalEnable(false); // disable captive portal redirection
  // wm.setAPClientCheck(true); // avoid timeout if client connected to softap

  // wifi scan settings
  // wm.setRemoveDuplicateAPs(false); // do not remove duplicate ap names (true)
  // wm.setMinimumSignalQuality(20);  // set min RSSI (percentage) to show in scans, null = 8%
  // wm.setShowInfoErase(false);      // do not show erase button on info page
  // wm.setScanDispPerc(true);       // show RSSI as percentage not graph icons

  // wm.setBreakAfterConfig(true);   // always exit configportal even if wifi save fails

  bool res;
  // res = wm.autoConnect(); // auto generated AP name from chipid
  // res = wm.autoConnect("AutoConnectAP"); // anonymous ap
  res = wm.autoConnect("AutoConnectAP","password"); // password protected ap

  if(!res) {
    Serial.println("Failed to connect or hit timeout");
    // ESP.restart();
  }
  else {
    //if you get here you have connected to the WiFi
    Serial.println("connected...yeey :)");
  }
}

void checkButton(){
  // check for button press
  if ( digitalRead(TRIGGER_PIN) == LOW ) {
    // poor mans debounce/press-hold, code not ideal for production
    delay(50);
    if( digitalRead(TRIGGER_PIN) == LOW ){
      Serial.println("Button Pressed");
      // still holding button for 3000 ms, reset settings, code not ideaa for production
      delay(3000); // reset delay hold
      if( digitalRead(TRIGGER_PIN) == LOW ){
        Serial.println("Button Held");
        Serial.println("Erasing Config, restarting");
        wm.resetSettings();
        ESP.restart();
      }

      // start portal w delay
      Serial.println("Starting config portal");
      wm.setConfigPortalTimeout(120);

      if (!wm.startConfigPortal("OnDemandAP","password")) {
        Serial.println("failed to connect or hit timeout");
        delay(3000);
        // ESP.restart();
      } else {
        //if you get here you have connected to the WiFi
        Serial.println("connected...yeey :)");
      }
    }
  }
}


String getParam(String name){
  //read parameter from server, for customhmtl input
  String value;
  if(wm.server->hasArg(name)) {
    value = wm.server->arg(name);
  }
  return value;
}

void saveParamCallback(){
  Serial.println("[CALLBACK] saveParamCallback fired");
  Serial.println("PARAM customfieldid = " + getParam("customfieldid"));
}

void loop() {
  checkButton();
  // put your main code here, to run repeatedly:
}
9.2 SmartConfig 配网
智能配网( SmartConfig )可直接用手机配网,不需要提供额外的人机交互接口。采用UDP广播模式(UDP接收IP地址是255.255.255.255)。WiFi设备先scan环境下AP,得到AP的相关信息,如工作的channel,然后配置WiFi芯片工作在刚才scan到的channel上去接收UDP包,如果没有接收到将继续配置工作在另外的channel上,如此循环,直到收到UDP包为止。此种办法的缺点是成功率只有70%,而且有些路由器不支持,优点是一键即可完成联网。
API参考
beginSmartConfig() - 启动配网模式
语法
WiFi.beginSmartConfig();
参数
无
返回
| 返回值 | 说明 | 值范围 |
|---|---|---|
| bool | true:启动配网模式成功 false:启动失败 |
stopSmartConfig() - 停止Smartconfit
语法
WiFi.stopSmartConfig()
参数
无
返回
| 返回值 | 说明 | 值范围 |
|---|---|---|
| bool | true:停止配网模式成功 false:停止配网模式失败 |
smartConfigDone() - 查询是否完成配网
语法
while (!WiFi.smartConfigDone()) {
	delay(500);
    Serial.print(".");
 }
参数
无
返回
| 返回值 | 说明 | 值范围 |
|---|---|---|
| bool | true:启动配网模式成功 false:启动失败 |
例程:SmartConfig 配网
选择下面的例程下载到Edge101WE主板。
(参考Arduino IDE例程 Examples -> Examples for Edge101WE ->WiFi/examples/WiFiSmartConfig)
#include "WiFi.h"

void setup() {
  Serial.begin(115200);

  //Init WiFi as Station, start SmartConfig
  WiFi.mode(WIFI_AP_STA);
  WiFi.beginSmartConfig();

  //Wait for SmartConfig packet from mobile
  Serial.println("Waiting for SmartConfig.");
  while (!WiFi.smartConfigDone()) {
    delay(500);
    Serial.print(".");
  }

  Serial.println("");
  Serial.println("SmartConfig received.");

  //Wait for WiFi to connect to AP
  Serial.println("Waiting for WiFi");
  while (WiFi.status() != WL_CONNECTED) {
    delay(500);
    Serial.print(".");
  }

  Serial.println("WiFi Connected.");

  Serial.print("IP Address: ");
  Serial.println(WiFi.localIP());
}

void loop() {
  // put your main code here, to run repeatedly:

}
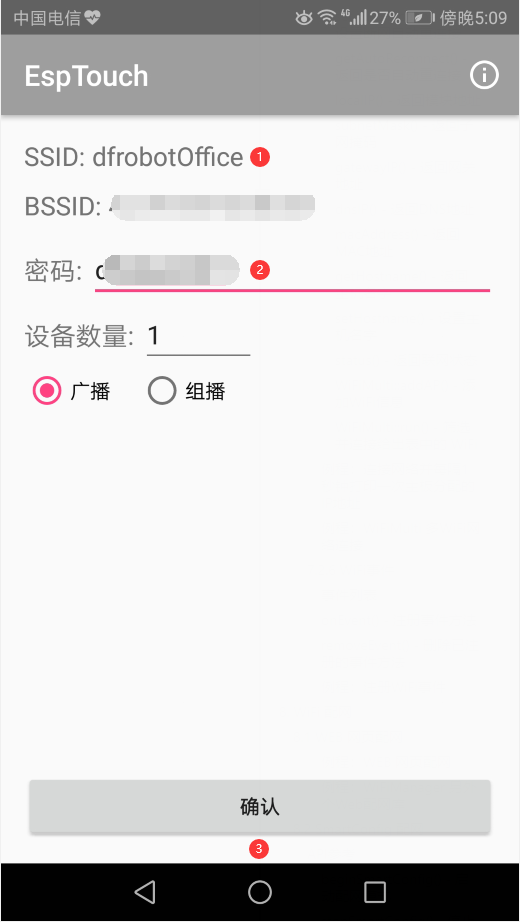
通过Google App商店或者乐鑫网址下载 ESP-TOUCH 安装到手机:
打开App,输入当前手机连接WiFi的密码后,SSID和password将发送到 Edge101WE 主板。
此时从串口打印出连接成功结果
............................................................................................................
SmartConfig received.
Waiting for WiFi
WiFi Connected.
IP Address: 192.168.1.63